Recently, I was fortunate to spend a few months working for Cisco, doing tech support for their Meraki products. As an avid self-hoster, I was a bit apprehensive about the idea of a cloud managed networking platform. But boy was I wrong.
The whole experience was a lot of fun. I helped foreign ministries with their Meraki onboarding. I had a pleasure of assisting an animation studio that played a great role in my life growing up with their WiFi troubles. I troubleshot client VPN issues for my favorite watch brand, discovering an unexpected behavior, and worked with the product team to improve the customer experience.
I don’t think anyone has doubts that Meraki’s hardware is solid. Meraki is a part of Cisco, they know how to build networking equipment. In many ways, they are Networking. But other vendors make solid networking equipment as well. And I would argue that Meraki’s secret sauce is not the hardware, it’s the Meraki Dashboard.
Meraki Dashboard is a management plane for the Meraki equipment (duh). It allows for full management control of the equipment. In fact, there’s very little you can do on the Meraki devices locally: just set up an IP address, and get a SDB (support data bundle). And I experienced its power.
As an “enterprise. at home” enthusiast, I wanted to lay my hands on a Meraki device, their MX security appliance, in particular. After hours of deliberations on which MX to get, I got a Z4 teleworker gateway. The Z-series appliances are also known as “baby MX”, so I think it was fitting.
On the way home, sitting in the airport with nothing better to do, I decided to configure my yet-to-be-received teleworker gateway. I created a Meraki Dashboard organization, a network, and went ahead configuring it. I created VLANs, decided on the IP subnetting scheme, created SSIDs and firewall rules.
A few days later, when I got my Z4 (every time I say Z4, I think of BMW, it’s really a shame that they’re discontinuing their Z4), I claimed it to my organization and assigned it to the network I created while at the airport. And that’s it. All I needed to do was to plug a network cable into the port labeled “Internet” and to provide power. The Z4 pulled the configuration from the dashboard and was up and running. I guess I still needed to plug it in, so not “true” zero-touch provisioning. Maybe 0.2-touch provisioning? Rounding down it would be zero-touch provisioning, good enough for me.
This experience inspired me to explore the Meraki platform for the homelab application further. I’ll do a few posts on how it fits into my work flow, what works, what doesn’t, and the overall experience with the platform. We’ll probably start with the device onboarding, then will go into IPSec VPN and, its magical sibling, Meraki Auto-VPN.
OK, this post’s been long enough, I better wrap it up. Till next time…
Since our Debian server is headless, we probably access it through SSH, which stands for Secure SHell. Now it’s time to make it even more secure.
The best practice says you should set up SSH keys and disable the password login. This way the authentication is done with public-private cryptography. Which is pretty secure. And disabling password authentication makes it immune to the bruteforce login attempts.
To generate the private-public key pair, on your Linux (or a Mac) computer, open the terminal and type ssh-keygen -o -a 100 -t ed25519 -f ~/.ssh/<SERVER_HOSTNAME>, where <SERVER_HOSTNAME> is the server name. You can name it whatever you want.
Now, we copy the key to our server with the following command, where <SERVER_USERNAME> is the username of the user you’d be logging in to your server with, and <SERVER_IP> is your server’s IP address:
Now to access your server with the keys, we use: ssh -i ~/.ssh/<SERVER_HOSTNAME> <SERVER_USERNAME>@<SERVER_IP> .
Next step is to disable password authentication for SSH. To accomplish this, we edit the /etc/ssh/sshd_config file with a command sudo nano /etc/ssh/sshd_config. Now make sure the file has the following lines:
PasswordAuthentication no
UsePAM no
PermitRootLogin no
You can change the port SSH listens on to something different. To do so, uncomment this line #Port 22 (by removing the # symbol) and change the number to something else. I recommend using a port number in the range 49152–65535. This way, somebody trying port 22 won’t be able to access your server through SSH because SSH is listening on another port. This is what’s called security by obscurity. It is not a best practice as it doesn’t necessarily make your system more secure but may stop script kiddies from trying. But they should also be stopped by all the other actions we’re taking.
And now reload SSH with sudo systemctl reload ssh.
ufw – uncomplicated firewall
Now secure the server with a firewall. You can use iptables, but I prefer ufw, as it’s pretty uncomplicated, and it’s just a front end for iptables anyways. To install ufw we run
sudo apt update && sudo apt install ufw -y
Now allow SSH through the ufw firewall (where AAA.BBB.CCC.DDD is the ip you want to allow through ufw, or put any, if you want to open the port to any ip. You can use ssh in port if you kept it default, or change it to the value you change the SSH server listening port to). Make sure you do this step before enabling ufw as doing otherwise will lock you out and will have to figure out a way to console into your server. ufw blocks all incoming connections by default and without punching this hole first you won’t have any access from the network:
sudo ufw allow from AAA.BBB.CCC.DDD to any port ssh proto tcp
sudo ufw enable
We could stop here. But why? Let’s install fail2ban and ban those IPs trying to login to our secure server without our authorization.
fail2ban
Install fail2ban and make sure it’s enabled on start with:
And now edit it with sudo nano /etc/fail2ban/jail.local.
When you get to the line ignoreip = make sure you include your IP so you won’t be locked out.
Fort the ban times adjust the default parameters how you see fit:
# "bantime" is the number of seconds that a host is banned.
bantime  = 1d

# A host is banned if it has generated "maxretry" during the last "findtime"
# seconds.
findtime  = 30m

# "maxretry" is the number of failures before a host get banned.
maxretry = 3
Next makes sure backend says backend = systemd. This is required for the systems with systemd, such as Debian (since Debian 9 “stretch”).
Next scroll down to the # JAILS section and make sure your [sshd] is as follows:
It permanently bans (bantime = -1) the IPs if they try and fail to access our server 4 times (maxretry = 4) within time period of 1 day (findtime = 1d).
To check the status of fail2ban and sshd jail use the commands:
sudo fail2ban-client status
sudo fail2ban-client status sshd
Now, edit the file /etc/users.oath with the user (<SERVER_USERNAME>) who should have 2FA enabled, use the number generated with the command above (18c34c49adb7fdacf67d53d0bb7339 in our example, make sure you use your output). You can have multiple users in this file, but each user needs to have its own line.
A few comments and explanation of the command parameters:
<SERVER_USERNAME> – username of the user you’re enabling 2FA for
18c34c49adb7fdacf67d53d0bb7339 – string from above
--digits=6 – number of digits for the 2FA code. You can use 6,7, or 8, but even after about an hour of trying, I couldn’t make it work with anything other than 6. 6 is perfectly adequate.
issuer=<SERVER_HOSTNAME> – not required, but it’s useful to see in the Authenticator app.
Scan the QR code with your authenticator app on your phone.
Now edit /etc/ssh/sshd_config by running sudo nano /etc/ssh/sshd_config and change the lines to:
Next, edit /etc/pam.d/sshd by running sudo nano /etc/pam.d/sshd. Comment out @include common-auth by putting a # symbol in front of it (otherwise SSH would ask you for the password in addition to the SSH keys and the second factor time code), and include auth requisite pam_oath.so usersfile=/etc/users.oath window=5 digits=6 below @include common-account.
Now restart sshd and you should be all set:
sudo systemctl restart sshd
It was a lot of text and a lot of steps. We installed a few applications and configured our server to use SSH keys, disabled password authentication, installed and enabled firewall, installed fail2ban to ban IPs trying to access our server, and added another layer of security by utilizing 2-factor authentication. It was a lot of work. There’s no simple wizard that would do it for us. But hey. It’s free, at least…
I used this website for 2FA setup. But I needed to adjust it to make it work on Debian 12. ↩︎
sudo ufw allow from AAA.BBB.CCC.DDD to any port ssh proto tcp
to open up access to your Debian based SSH server through ufw. In this tutorial we’ll be using 2 machines: our server which we’re accessing using SSH, and our workstation. It’s pretty simple in the home LAN environment, replace AAA.BBB.CCC.DDD with your workstation’s IP address, like 192.168.1.201, or whatever it is, and you’re done. But what if the server is remote and your workstation’s home ISP only provides you a dynamic IP address? That’s where DDNS comes in.
DDNS, or Dynamic DNS, or DynDNS, is a method of updating the DNS record that points to your network. When your ISP changes your external IP address (when your router reboots, for example), a DDNS client can send the new address to a DDNS provides who updates the DNS record. Some home routers have this functionality built in and they monitor your IP address and update DDNS as needed. But they usually work with a limited number of providers. There are also software clients that you can run on your system, ddclient, for example. And you can run it on any (almost) machine in your network as your router has only one external IP address regardless of the number of internal devices it’s routing to. Let’s not think about the situations with dual WAN, or if you restrict a machine to route all traffic through a VPN. If you’re doing that you probably can figure out how to set DDNS up.
But don’t want to install additional packages and would rather achieve the same result with a help of Bash scripts. We’ll be setting up two scripts. One on the workstation that will keep the DNS record up to date, and another one on the server that will look at the DNS record and update its firewall to allow SSH access only from that IP address. We need the second script as ufw does not work with the domain names but only with the IP addresses. So we’ll need a way to resolve the domain name into the IP and tell ufw to allow that IP.
If you’re going with the implementation on your router, use the services programmed in it. But I will be of no help to you as I don’t know what router you have. Instead, I’ll focus on how to update your DNS record from a Linux machine.
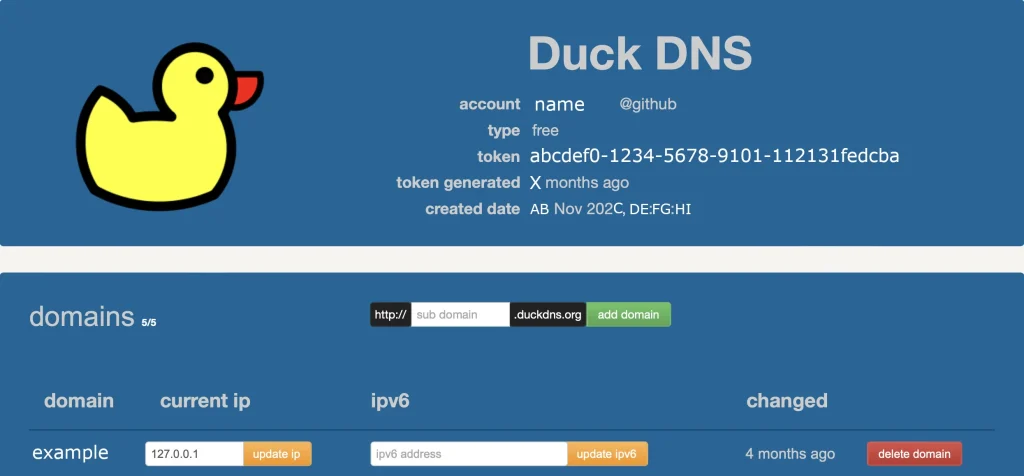
So how do we set DDNS up? First, we need a FQDN, or a Fully Qualified Domain Name, like itsfreeatleast.blog (or itsfreeatleast.com). Since we want it for free, I suggest we use DuckDNS. It’s a free DDNS service that allows you to have up to 5 domains (such as example.duckdns.org). DuckDNS even gives you specific instruction on how to create a script that automatically updates your DNS record here.
Important fields to note on the DuckDNS page (after you login) are the domain and the token, example and abcdef0-1234-5678-9101-112131fedcba, respectively.
Now let’s create a script to update the DuckDNS record. We’ll save the script somewhere your user has access to and name it something like duckdnsupdate.sh. You don’t need to be root to run this script, so the home directory is fine. Adjust the values for the domain <example> and the token <abcdef0-1234-5678-9101-112131fedcba> to the ones shown for you. Use your favorite text editor, I prefer nano.
nano $HOME/duckdnsupdate.sh
Copy and paste the following script:
 #!/bin/bash

DOMAIN = <example>
TOKEN = <abcdef0-1234-5678-9101-112131fedcba>

OLD_IP=$(/usr/bin/host $DOMAIN.duckdns.org | /usr/bin/awk '/has address/ { print $4 }')
if [[ "$OLD_IP" =~ ^(([1-9]?[0-9]|1[0-9][0-9]|2([0-4][0-9]|5[0-5]))\.){3}([1-9]?[0-9]|1[0-9][0-9]|2([0-4][0-9]|5[0-5]))$ ]]; then
    :
else
  /usr/bin/echo "Failed getting Old IP. Using a dummy address."
  OLD_IP="10.111.111.111"
fi
/usr/bin/echo "Old IP is $OLD_IP"

NEW_IP=$(/usr/bin/curl -s --connect-timeout 20 https://checkip.amazonaws.com)
if [[ "$NEW_IP" =~ ^(([1-9]?[0-9]|1[0-9][0-9]|2([0-4][0-9]|5[0-5]))\.){3}([1-9]?[0-9]|1[0-9][0-9]|2([0-4][0-9]|5[0-5]))$ ]]; then
  /usr/bin/echo "New IP is $NEW_IP"
else
  /usr/bin/echo "Failed getting new IP"
  exit 1
fi

if [ "$NEW_IP" = "$OLD_IP" ]; then
  /usr/bin/echo "IP is already correct"
else
/usr/bin/echo url="https://www.duckdns.org/update?domains=$DOMAIN&token=$TOKEN&ip=" | /usr/bin/curl -s --connect-timeout 20 -k -o /tmp/.duckdns/duck.log -K - && /usr/bin/echo "New IP updated!" || /usr/bin/echo "New IP Update Failed!"
fi

exit 0
Exit with CTRL + X, Y to save changes, and Enter.
Now, let’s break it down.
First, we query a DNS server for the IP address of our domain and assign it to a variable OLD_IP with
Then we check whether the value looks like a legit IP address:
if [[ "$OLD_IP" =~ ^(([1-9]?[0-9]|1[0-9][0-9]|2([0-4][0-9]|5[0-5]))\.){3}([1-9]?[0-9]|1[0-9][0-9]|2([0-4][0-9]|5[0-5]))$ ]];
If it is fine, we continue, if not (it timed out, or connection is down, for example), we use a “dummy” IP address. It can be anything.
Next, we get our external IP address. For that we query https://checkip.amazonaws.com. We use the curl command and we also want to include a connection timeout (20 seconds) and the same validity check as with the OLD_IP.
If everything goes fine, we assign the IP to a variable NEW_IP, if not, we exit the script.
Then, we compare the OLD_IP (the one the DNS knows) with the NEW_IP (our current external IP). If they match we print "IP is already correct" on the screen and exit. If they don’t match, we send our new IP to DuckDNS and update the record for our domain like so:
/usr/bin/echo url="https://www.duckdns.org/update?domains=$DOMAIN&token=$TOKEN&ip=" | /usr/bin/curl -s --connect-timeout 20 -k -o /tmp/.duckdns/duck.log -K - && /usr/bin/echo "New IP updated!" || /usr/bin/echo "New IP Update Failed!"
This command includes a 20 second timeout and prints out whether the IP update was successful or not. It also places the status update in the file /tmp/.duckdns/duck.log.
Next we’ll make sure only our user owns the file (the chown command) and we’ll the file executable (the chmod command). I also like to tighten down the permissions just a bit.
Now let’s automate it. We’ll periodically check what the DNS server thinks our IP is, compare it with ours, and update, as needed. I think 15 minute interval is fine, but you can use whatever value you find acceptable. Updating it too frequently places additional burden on the DuckDNS servers, which is not a nice thing to do. Updating it too infrequently will make you wait longer if your external IP updates. We’ll use the good old crontab for this. You can use the systemd timers, but crontab is fine for this.
Use the following command to edit your crontab. It may ask you which text editor to use, again, I prefer nano.
crontab -e
Add the following lines to the bottom (make sure you change <username> to your user, in other words, make sure you use the absolute path to the script duckdnsupdate.sh.
Now, let me explain. The first line tells crontab that after reboot it should wait for 5 seconds and execute the script. The wait is just to ensure the workstation got the internet connection. You may adjust this value. The second line calls the script every 15 minutes. The syntax of crontab is weird, so you can use a generator. > /dev/null 2>&1 is to suppress any text output as we don’t need it.
I prefer to use absolute paths in crontab. It is better for security and here’s why.
If you run the command
echo $PATH
it will show you everything that is contained in the global environmental variable PATH, like so:
When you call a command, let’s say ls, Linux looks through the paths in the environmental variable PATH for the binary called ls. It does so folder by folder in the order from let to right. On my system, and probably on yours too, ls is located in /usr/bin/ls. You can verify it by running which ls command. So, if a malicious actor is able to access the folder /usr/local/bin and place a malicious file named ls in there, next time you call the ls command, the system will execute /usr/local/bin/ls instead of /usr/bin/ls. The malicious actor can even add folders to the beginning of the PATH variable and store their malicious binaries there. This can lead to privilege escalation and a whole bunch of heartburn. So if you don’t use the absolute variables and the malicious actor performs this type of attack, next time your crontab runs, it will execute the malicious binary. Scary stuff…
OK, we’re done with our workstation. Now it updates the DNS record for example.duckdns.org to our IP address keeps periodic checks for changes.
Now, let head to our server and allow SSH from only our IP address. We’ll do the steps similar to the workstation setup. We’ll create a script file and add it to crontab. We will need to run the script as root, though, because only root can update the firewall parameters. OK, let’s go.
sudo nano /root/ufwallow.sh
Adjust the hostname and the SSH port (default 22) to match your setup. The log file location can stay as is.
#!/bin/bash
HOSTNAME=<example>.duckdns.org
LOGFILE=/root/ufwallowlog
SSH_Port=<22>

Current_IP=$(/usr/bin/host $HOSTNAME | /usr/bin/awk '/has address/ { print $4 }')
if [[ "$Current_IP" =~ ^(([1-9]?[0-9]|1[0-9][0-9]|2([0-4][0-9]|5[0-5]))\.){3}([1-9]?[0-9]|1[0-9][0-9]|2([0-4][0-9]|5[0-5]))$ ]]; then
#    :
  /usr/bin/echo "IP for $HOSTNAME is $Current_IP"
else
  /usr/bin/echo "Failed getting IP"
  exit 1
fi

if [ ! -f $LOGFILE ]; then
    /usr/sbin/ufw allow from $Current_IP to any port $SSH_Port proto tcp
    /usr/bin/echo $Current_IP > $LOGFILE
else

    Old_IP=$(/usr/bin/cat $LOGFILE)
    if [ "$Current_IP" = "$Old_IP" ] ; then
        /usr/bin/echo "IP address has not changed"
    else
        /usr/sbin/ufw allow from $Current_IP to any port $SSH_Port proto tcp
        /usr/sbin/ufw delete allow from $Old_IP to any port $SSH_Port proto tcp
        /usr/bin/echo $Current_IP > $LOGFILE
        /usr/bin/echo "ufw has been updated"
    fi
fi
This section gets the current IP address of our workstation using DNS and it checks if the number makes sense. If it does, it assigns it to Current_IP, if not, it exits.
Then it checks if the file /root/ufwallowlog exits and is not empty. Actually, it check the inverse of that, the if statement is true if the file does not exits. This file keeps track of what IP ufw allows SSH access from. If the file does not exit, we just add the rule to ufw.
if [ ! -f $LOGFILE ]; then
    /usr/sbin/ufw allow from $Current_IP to any port $SSH_Port proto tcp
    /usr/bin/echo $Current_IP > $LOGFILE
If it does exit, we read the value from it and compare it to the Current_IP address.
    Old_IP=$(/usr/bin/cat $LOGFILE)
    if [ "$Current_IP" = "$Old_IP" ] ;
If they’re the same, the script just tells us so "IP address has not changed". If it has changed, the script allows access from Current_IP and deletes the rule allowing Old_IP. It then overwrites the log file with the Current_IP for use next time.
/usr/sbin/ufw allow from $Current_IP to any port $SSH_Port proto tcp
/usr/sbin/ufw delete allow from $Old_IP to any port $SSH_Port proto tcp
/usr/bin/echo $Current_IP > $LOGFILE
/usr/bin/echo "ufw has been updated"
After creating the file we’ll make sure it’s owned by root and only root can read and execute it:
Again, you can adjust the parameters as you see fit.
And this is it…
OK. It’s a lot of words. But now we have a fully qualified domain name which is being updated from our workstation with our external IP address. Our remote SSH server periodically queries a DNS server to resolve the IP of our workstation and makes sure the IP can access the SSH server. Updates are made as necessary. What I noticed, though, that DuckDNS sometimes is slow to resolve the domains into IP addresses. It happens on some corporate networks. Maybe next time we’ll look at the alternatives. But hey, it’s free, at least…
In this post I explain what I like to do in post-install setup of my Debian VMs. First, I disable ipv6. Yes, I am a luddite but I think the ipv6 designers should have spent more time with the user focus groups. Colons? Seriously? Take a look at your keyboard right now. I’ll wait. How do you type a colon? That’s right it’s Shift + the key that shares the colon and semicolon symbols. Now compare that to typing an ipv4 address on a numpad. You can probably do it with your eyes closed. Divine! This really shows the importance of involving the end users in your technical standard development. /rant. Plus, I don’t have ipv6 on my network. I have a router that NATs to the internet, so I think I’ll be fine with the ipv4 address space.
There are a number of ways to disable ipv6 on your Debian machine. You can run the following commands. But it won’t be persistent, meaning after reboot ipv6 will be enabled again.
To have ipv6 disabled permanently, edit /etc/sysctl.conf with your favorite text editor, I prefer nano, so like this sudo nano /etc/sysctl.conf. And add the following at the end:
Another way to disable ipv6 is to give the GRand Unified Bootloader (GRUB) the Linux kernel boot parameters. To do so edit /etc/default/grub and change the lines GRUB_CMDLINE_LINUX_DEFAULT and GRUB_CMDLINE_LINUX to include parameter ipv6.disable=1. After editing the file, run sudo update-grub to, you guessed it, update GRUB.
Alternatively, create a bash script with the code below and run it as root.